This falls into the heading of maintenance adventures, I guess:
I've learned that the lights on the side and top of the rig are called "marker lights." I've known that at least one of these (eye-level on the curb side) was pretty banged up:
So I looked at the others (there are 7 all told) and they were all in pretty bad shape: cracked, and in some cases with holes where the plastic had just fallen away.
I'm assuming that this is the result of sitting out in the sun for 16 years. I ordered a bunch of them from Amazon, and decided to tackle the two at eye level first, just to get the hang of it.
I thought I was going to install these two in about an hour or less, and then go back to the continuing project of replacing interior window valances. Hah!
Turns out I had ordered the right replacement fixtures. Yay me! So I took off the one on the right side, and snipped the wires leading back into the body of the rig. I momentarily let go of one of the wires, and it obligingly slips down out of sight into the belly of the Beast. Bad words were heard in the parking lot.
I hoped maybe the wire that had slipped away was the ground, and I could find some other place to run a ground wire from. No joy. I got out the wiring diagrams, and the marker lights turn out to run off the same circuit as the chassis running lights. Cool.
I took a deep breath (this is scary stuff for me) and removed the tail light assembly:
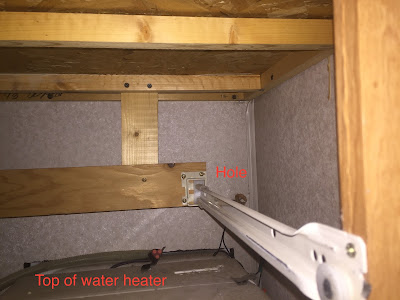
Oh… there’s a hole for those wires. Where does that go? Gotta be near the hot water heater. So I haul a drawer in the bathroom out so I can see the hot water heater, peer around and poke around and dang! there’s my missing green wire. Joy! After that it was pretty easy: push the wire back out the hole. You can see the hole just at the end of the drawer guide:
Attach various wires, check to make sure it lights up when it should, and done! I had left the butyl sealing tape in the refrigerator at home, so I couldn’t put the tail light assembly back in place for good. It was supposed to rain, so I taped the assembly in place with gorilla tape.
The left-side marker light replacement took all of 20 minutes, if that.
The key sentence in this story is "I took a deep breath (this is scary stuff for me)…” It’s pretty simple, and I did a good job of figuring out what to do to fix the result of my clumsiness. But this kind of work is not my forte: as I’ve said over and over, I’m a software guy. A clumsy software guy.
Emboldened by this success in the face of adversity, in a couple of days I did a permanent installation of the tail-light assembly, and went back at the upper lights, which involved a lot of time on a ladder. Here's what the job looked like with some of the lights replaced. Guess which are the new ones :-)
The light on the far right of the picture above was the last one. It's a fact in the world of mountaineering that most bad accidents happen on the descent, when people are tired and the emotional rush of the summit has worn off. By the time I got to the last one I was tired. And just a little inattentive. I dropped a screw, which disappeared into the dirt. The replacement I found wasn't just the right size, and I cracked the plastic housing. Sigh.
I patched it up and put my toys away, and the next Amazon order I'll get another light, take a deep breath, and do it right. They're not very expensive, but still...
I'll tell you more about the new window valances real soon now.


No comments:
Post a Comment